家里有1台惠普的打印、复印、扫描一体机HP Laserjet M1005 MFP,想挂在路由器上,实现网络共享打印及扫描,但这款机子只有usb口,没有网络接口,要如何实现呢?其实,只要我们有一台刷了OpenWrt系统又带usb接口的路由器(例如我们前面讲过的TL-WR720N、TL-WDR4310等等),实现起来就非常简单了。下面我们就来详细讲解一下惠普M1005实现网络共享打印及扫描的整个过程。
一、网络共享打印功能的实现
(一)路由器端设置
1、先在OpenWrt路由器上安装必要的支撑程序:
opkg update

opkg install kmod-usb-printer p910nd luci-app-p910nd
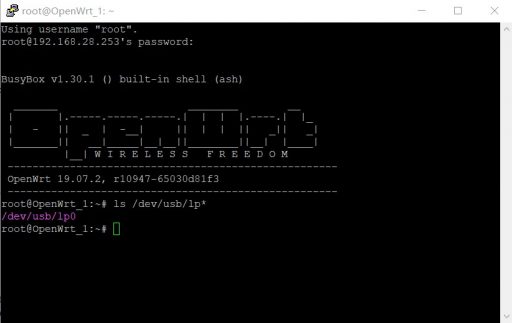
2、将打印机接入路由器usb口,开启电源;然后电脑连接路由器,用如下命令确认打印机安装是否成功:
ls /dev/usb/lp*

# 显示示例如下

/dev/usb/lp0
若有显示类似 “/dev/usb/lp0“,则表示安装成功。

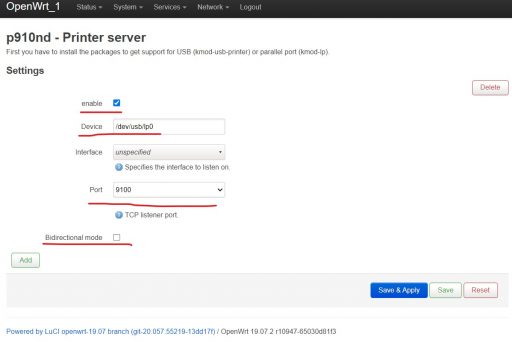
3、打开路由器中p910nd服务器的Luci设置页面:
1)选择启用p910nd服务,即”enable”选项打勾;
2)不要选择双向模式,即将双向模式”Bidirectional mode”后面的勾去掉(注:M1005必须去掉,其它机型自己测试)。

4、防火墙打开9100端口(注:高版本OpenWrt系统,可以省略这一步,系统在安装p910nd服务时会自动允许9100端口数据通行)。
5、重启路由器(注:M1005必须重启路由器,只重启p910nd服务没用)。
(二)电脑端设置(以win10系统为例)
1、打开“添加打印机和扫描仪”,然后点选“我需要的打印机不在列表中”;
2、选中“使用TCP/IP地址或主机名添加打印机”,点“下一步”;
3、输入ip地址:例如192.168.1.1;输入端口名称:随便自定义;点“下一步”;
4、选中“自定义”,点“设置”进入设置页面,在设置页面输入正确的IP地址及端口号等,点“OK”回原页面;再点“下一步”;
5、然后选择正确的打印机驱动程序(注:可以事先安装后,因为hp一般只提供exe安装文件),系统会自动提示用现有的驱动程序;
6、设置完成之前,可以点一下“打印测试页”,以测试所有设置是否正确。
二、网络共享扫描功能的实现
(一)路由器侧设置
1、在OpenWrt上安装必要的支撑程序:
opkg update

opkg install sane-daemon sane-frontends sane-hpljm1005 xinetd
sane-hpljm1005是HP Laserjet M1005 MFP的扫描驱动程序,若是其它机型,则需要自己查询如下网站进行确认。
http://www.sane-project.org/sane-backends.html#SCANNERS
2、运行一下以下命令确认扫描仪是否正确安装:
scanimage -L

# 显示示例如下

device `hpljm1005:libusb:001:002' is a Hewlett-Packard LaserJet M1005 multi-function peripheral
显示类似 “device `hpljm1005:libusb:001:002′ is a Hewlett-Packard LaserJet M1005 multi-function peripheral” 即OK。
Ps:如果是在虚拟机上建设的软路由,需要事先确认软路由上是否已添加相应的USB设备支持,有时软路由重启时刚好M1005处于关机状态,则对应的usb设备就会丢失。
3、开启监控,修改 /etc/xinetd.d/sane-port的内容,将最后的 disable = yes 改成 disable = no
vim /etc/xinetd.d/sane-port

# default: off
# description: The saned provides scanner service via the network.
#       Applications like kooka, xsane or xscanimage can use the remote
#       scanner.
service sane-port
{
        socket_type = stream
        port        = 6566
        wait        = no
        user        = root
        group       = root
        server      = /usr/sbin/saned
        disable     = no
}
4、添加内网使用扫描仪支持,在 /etc/sane.d/saned.conf 中添加,例如:192.168.1.0/24
vim /etc/sane.d/saned.conf

# saned.conf
# Configuration for the saned daemon

## Daemon options
# Port range for the data connection. Choose a range inside [1024 - 65535].
# Avoid specifying too large a range, for performance reasons.
#
# ONLY use this if your saned server is sitting behind a firewall. If your
# firewall is a Linux machine, we strongly recommend using the
# Netfilter nf_conntrack_sane connection tracking module instead.
#
# data_portrange = 10000 - 10100


## Access list
# A list of host names, IP addresses or IP subnets (CIDR notation) that
# are permitted to use local SANE devices. IPv6 addresses must be enclosed
# in brackets, and should always be specified in their compressed form.
#
# The hostname matching is not case-sensitive.

#scan-client.somedomain.firm
#192.168.0.1
#192.168.0.1/29
#[2001:db8:185e::42:12]
#[2001:db8:185e::42:12]/64

192.168.1.0/24

# NOTE: /etc/inetd.conf (or /etc/xinetd.conf) and
# /etc/services must also be properly configured to start
# the saned daemon as documented in saned(8), services(4)
# and inetd.conf(4) (or xinetd.conf(5)).
5、防火墙打开6566端口(注:高版本OpenWrt系统不需要)
6、重启路由器
(二)电脑侧设置(以win10下安装为例)
1、先下载wiasane:http://github.com/mback2k/wiasane,然后安装,按提示输入相关内容即可;
2、利用“windows附件”中的“windows 传真和扫描”就可进行网络共享扫描了。
这次我们讲解了惠普M1005实现网络共享打印及扫描的设置方法,这是一项非常实用的应用,特别是家里有多台电脑的时候,实现共享以后每台电脑都好像连接了一个打印机和扫描仪,可以省去很多不必要的麻烦。如果你家里有类似老式的打印机或扫描仪,建议可以用类似的方法去试试实现网络共享的乐趣。