Netgear-wndr3700-v4刷OpenWrt固件

前面我们讲了Netgear-wndr4300-v1刷OpenWrt固件时充分利用128M闪存的方法,但是在自编译的过程中我们采用的是ar71xx分支,而没有采用最新的ath79分支(注:在OpenWrt源码的Master分支以后将不再支持ar71xx-ar91xx,只支持ath79)。因此今天就利用Netgear-wndr3700-v4刷OpenWrt固件的过程来讲解一下,在ath79分支下如何自编译128M固件的方法。

1、设置自编译环境
Plain text
Copy to clipboard
Open code in new window
EnlighterJS 3 Syntax Highlighter
git pull
git checkout master
./scripts/feeds update -a
./scripts/feeds install -a
git pull git checkout master ./scripts/feeds update -a ./scripts/feeds install -a
git pull
git checkout master
./scripts/feeds update -a
./scripts/feeds install -a
2、修改部分编译参数

1)修改 ~/target/linux/ath79/image/nand.mk 文件:

Plain text
Copy to clipboard
Open code in new window
EnlighterJS 3 Syntax Highlighter
define Device/netgear_wndr3700-v4
SOC := ar9344
DEVICE_MODEL := WNDR3700
DEVICE_VARIANT := v4
UIMAGE_MAGIC := 0x33373033
NETGEAR_BOARD_ID := WNDR3700v4
NETGEAR_HW_ID := 29763948+128+128
$(Device/netgear_ath79_nand)
endef
TARGET_DEVICES += netgear_wndr3700-v4
修改为
define Device/netgear_wndr3700-v4
SOC := ar9344
DEVICE_MODEL := WNDR3700
DEVICE_VARIANT := v4
UIMAGE_MAGIC := 0x33373033
NETGEAR_BOARD_ID := WNDR3700v4
NETGEAR_HW_ID := 29763948+128+128
$(Device/netgear_ath79_nand_128m)
endef
TARGET_DEVICES += netgear_wndr3700-v4
define Device/netgear_wndr3700-v4 SOC := ar9344 DEVICE_MODEL := WNDR3700 DEVICE_VARIANT := v4 UIMAGE_MAGIC := 0x33373033 NETGEAR_BOARD_ID := WNDR3700v4 NETGEAR_HW_ID := 29763948+128+128 $(Device/netgear_ath79_nand) endef TARGET_DEVICES += netgear_wndr3700-v4 修改为 define Device/netgear_wndr3700-v4 SOC := ar9344 DEVICE_MODEL := WNDR3700 DEVICE_VARIANT := v4 UIMAGE_MAGIC := 0x33373033 NETGEAR_BOARD_ID := WNDR3700v4 NETGEAR_HW_ID := 29763948+128+128 $(Device/netgear_ath79_nand_128m) endef TARGET_DEVICES += netgear_wndr3700-v4
define Device/netgear_wndr3700-v4
  SOC := ar9344
  DEVICE_MODEL := WNDR3700
  DEVICE_VARIANT := v4
  UIMAGE_MAGIC := 0x33373033
  NETGEAR_BOARD_ID := WNDR3700v4
  NETGEAR_HW_ID := 29763948+128+128
  $(Device/netgear_ath79_nand)
endef
TARGET_DEVICES += netgear_wndr3700-v4

修改为

define Device/netgear_wndr3700-v4
  SOC := ar9344
  DEVICE_MODEL := WNDR3700
  DEVICE_VARIANT := v4
  UIMAGE_MAGIC := 0x33373033
  NETGEAR_BOARD_ID := WNDR3700v4
  NETGEAR_HW_ID := 29763948+128+128
  $(Device/netgear_ath79_nand_128m)
endef
TARGET_DEVICES += netgear_wndr3700-v4

2)修改 ~/target/linux/ath79/dts/ar9344_netgear_wndr3700-v4.dts 文件:

Plain text
Copy to clipboard
Open code in new window
EnlighterJS 3 Syntax Highlighter
// SPDX-License-Identifier: GPL-2.0-or-later OR MIT
#include "ar9344_netgear_wndr.dtsi"
#include "ar9344_netgear_wndr_wan.dtsi"
#include "ar9344_netgear_wndr_usb.dtsi"
/ {
compatible = "netgear,wndr3700-v4", "qca,ar9344";
model = "Netgear WNDR3700 v4";
};
修改为
// SPDX-License-Identifier: GPL-2.0-or-later OR MIT
#include "ar9344_netgear_wndr_128m.dtsi"
#include "ar9344_netgear_wndr_wan.dtsi"
#include "ar9344_netgear_wndr_usb.dtsi"
/ {
compatible = "netgear,wndr3700-v4", "qca,ar9344";
model = "Netgear WNDR3700 v4";
};
// SPDX-License-Identifier: GPL-2.0-or-later OR MIT #include "ar9344_netgear_wndr.dtsi" #include "ar9344_netgear_wndr_wan.dtsi" #include "ar9344_netgear_wndr_usb.dtsi" / { compatible = "netgear,wndr3700-v4", "qca,ar9344"; model = "Netgear WNDR3700 v4"; }; 修改为 // SPDX-License-Identifier: GPL-2.0-or-later OR MIT #include "ar9344_netgear_wndr_128m.dtsi" #include "ar9344_netgear_wndr_wan.dtsi" #include "ar9344_netgear_wndr_usb.dtsi" / { compatible = "netgear,wndr3700-v4", "qca,ar9344"; model = "Netgear WNDR3700 v4"; };
// SPDX-License-Identifier: GPL-2.0-or-later OR MIT

#include "ar9344_netgear_wndr.dtsi"
#include "ar9344_netgear_wndr_wan.dtsi"
#include "ar9344_netgear_wndr_usb.dtsi"

/ {
    compatible = "netgear,wndr3700-v4", "qca,ar9344";
    model = "Netgear WNDR3700 v4";
};

修改为

// SPDX-License-Identifier: GPL-2.0-or-later OR MIT

#include "ar9344_netgear_wndr_128m.dtsi"
#include "ar9344_netgear_wndr_wan.dtsi"
#include "ar9344_netgear_wndr_usb.dtsi"

/ {
    compatible = "netgear,wndr3700-v4", "qca,ar9344";
    model = "Netgear WNDR3700 v4";
};

3)在 ~/target/linux/ath79/dts/新增文件ar9344_netgear_wndr_128m.dtsi,并将该目录下的ar9344_netgear_wndr.dtsi中的内容全部拷贝到新文件,并做如下修改:

>> 删除如下内容

Plain text
Copy to clipboard
Open code in new window
EnlighterJS 3 Syntax Highlighter
ubi-concat {
compatible = "mtd-concat";
devices = <&ubiconcat0 &ubiconcat1>;
partitions {
compatible = "fixed-partitions";
#address-cells = <1>;
#size-cells = <1>;
ubi@ac0000 {
label = "ubi";
reg = <0x0 0x7500000>;
};
};
};
ubi-concat { compatible = "mtd-concat"; devices = <&ubiconcat0 &ubiconcat1>; partitions { compatible = "fixed-partitions"; #address-cells = <1>; #size-cells = <1>; ubi@ac0000 { label = "ubi"; reg = <0x0 0x7500000>; }; }; };
ubi-concat {
    compatible = "mtd-concat";
    devices = <&ubiconcat0 &ubiconcat1>;

    partitions {
        compatible = "fixed-partitions";
        #address-cells = <1>;
        #size-cells = <1>;

        ubi@ac0000 {
            label = "ubi";
            reg = <0x0 0x7500000>;
        };
    };
};

>> 修改下面的内容

Plain text
Copy to clipboard
Open code in new window
EnlighterJS 3 Syntax Highlighter
ubiconcat0: partition@ac0000 {
label = "ubiconcat0";
reg = <0xac0000 0x1500000>;
};
partition@6c0000 {
label = "firmware";
reg = <0x6c0000 0x1900000>;
compatible = "openwrt,uimage", "denx,uimage";
openwrt,ih-magic = <0x33373033>;
openwrt,ih-type = <IH_TYPE_FILESYSTEM>;
};
partition@1fc0000 {
label = "caldata_backup";
reg = <0x1fc0000 0x40000>;
read-only;
};
ubiconcat1: partition@2000000 {
label = "ubiconcat1";
reg = <0x2000000 0x6000000>;
};
修改为
partition@ac0000 {
label = "ubi";
reg = <0xac0000 0x7500000>;
};
partition@6c0000 {
label = "firmware";
reg = <0x6c0000 0x7900000>;
compatible = "openwrt,uimage", "denx,uimage";
openwrt,ih-magic = <0x33373033>;
openwrt,ih-type = <IH_TYPE_FILESYSTEM>;
};
partition@7fc0000 {
label = "caldata_backup";
reg = <0x7fc0000 0x40000>;
read-only;
};
ubiconcat0: partition@ac0000 { label = "ubiconcat0"; reg = <0xac0000 0x1500000>; }; partition@6c0000 { label = "firmware"; reg = <0x6c0000 0x1900000>; compatible = "openwrt,uimage", "denx,uimage"; openwrt,ih-magic = <0x33373033>; openwrt,ih-type = <IH_TYPE_FILESYSTEM>; }; partition@1fc0000 { label = "caldata_backup"; reg = <0x1fc0000 0x40000>; read-only; }; ubiconcat1: partition@2000000 { label = "ubiconcat1"; reg = <0x2000000 0x6000000>; }; 修改为 partition@ac0000 { label = "ubi"; reg = <0xac0000 0x7500000>; }; partition@6c0000 { label = "firmware"; reg = <0x6c0000 0x7900000>; compatible = "openwrt,uimage", "denx,uimage"; openwrt,ih-magic = <0x33373033>; openwrt,ih-type = <IH_TYPE_FILESYSTEM>; }; partition@7fc0000 { label = "caldata_backup"; reg = <0x7fc0000 0x40000>; read-only; };
        ubiconcat0: partition@ac0000 {
            label = "ubiconcat0";
            reg = <0xac0000 0x1500000>;
        };

        partition@6c0000 {
            label = "firmware";
            reg = <0x6c0000 0x1900000>;
            compatible = "openwrt,uimage", "denx,uimage";
            openwrt,ih-magic = <0x33373033>;
            openwrt,ih-type = <IH_TYPE_FILESYSTEM>;
        };

        partition@1fc0000 {
            label = "caldata_backup";
            reg = <0x1fc0000 0x40000>;
            read-only;
        };

        ubiconcat1: partition@2000000 {
            label = "ubiconcat1";
            reg = <0x2000000 0x6000000>;
        };

修改为

        partition@ac0000 {
            label = "ubi";
            reg = <0xac0000 0x7500000>;
        };

        partition@6c0000 {
            label = "firmware";
            reg = <0x6c0000 0x7900000>;
            compatible = "openwrt,uimage", "denx,uimage";
            openwrt,ih-magic = <0x33373033>;
            openwrt,ih-type = <IH_TYPE_FILESYSTEM>;
        };

        partition@7fc0000 {
            label = "caldata_backup";
            reg = <0x7fc0000 0x40000>;
            read-only;
        };
3、自编译
Plain text
Copy to clipboard
Open code in new window
EnlighterJS 3 Syntax Highlighter
make menuconfig
make menuconfig
make menuconfig

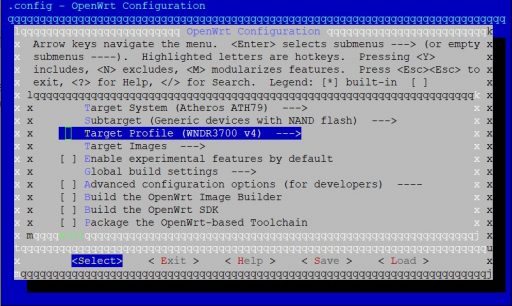
按下图配置,并将luci支持添加上:

Netgear-wndr3700-v4刷OpenWrt固件-1

执行自编译命令:

Plain text
Copy to clipboard
Open code in new window
EnlighterJS 3 Syntax Highlighter
make -j1 V=s
make -j1 V=s
make -j1 V=s

编译完成,你就可以在如下目录找到相应的新固件了:

~/bin/targets/ath79/nand/openwrt-ath79-nand-netgear_wndr3700-v4-squashfs-factory.img

4、将自编译生成的新固件刷入路由器中

Netgear-wndr3700-v4刷OpenWrt的方法,与Netgear-wndr4300-v1的方法是一样的,这里不再展开。另外,你也可以参考官方的刷机教程:https://openwrt.org/toh/netgear/wndr3700

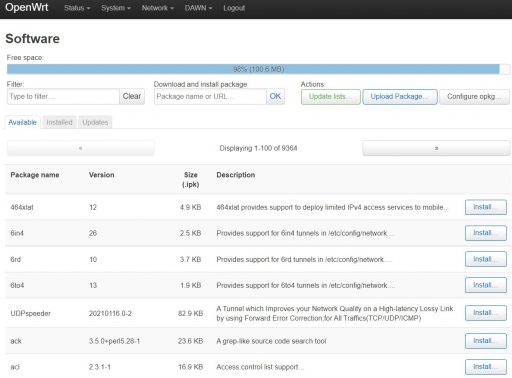
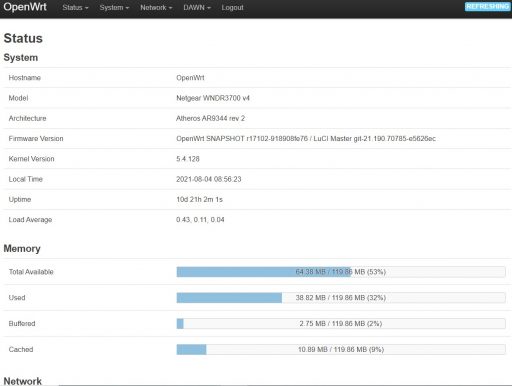
刷好以后的Luci界面如下:
Netgear-wndr3700-v4刷OpenWrt固件-2

Netgear-wndr3700-v4刷OpenWrt固件-3